- No products in the cart.
App Design and Prototyping
Check out the entire process from concept to completion on my blog linked below.
woocommerce-services domain was triggered too early. This is usually an indicator for some code in the plugin or theme running too early. Translations should be loaded at the init action or later. Please see Debugging in WordPress for more information. (This message was added in version 6.7.0.) in /home/torimili/htdocs/torimili/wp-includes/functions.php on line 6131philos domain was triggered too early. This is usually an indicator for some code in the plugin or theme running too early. Translations should be loaded at the init action or later. Please see Debugging in WordPress for more information. (This message was added in version 6.7.0.) in /home/torimili/htdocs/torimili/wp-includes/functions.php on line 6131Check out the entire process from concept to completion on my blog linked below.

Applications used:
Adobe Photoshop
Camera:
Canon EOS Rebel T6
Kit lens: 18-55mm
Featuring:
Instagram.com/hotfrogs.art
Applications used:
Adobe Photoshop
Equipment:
Canon EOS R
Finnhomy Lightbox
Considering the Principles and Elements of design create trifold Brochure for F.I.R.S.T Institute’s Graphic Design and Web Development Program using InDesign.
Before you begin:
Handcraft a Mockup Brochure by hand using paper. Fold one sheet of paper onto itself twice, and label your sides to visualize your format!
Getting Started:
Document Settings
Requirements:
See provided assets below:
Applications Used:
Adobe InDesign
Adobe Photoshop
Adobe Illustrator
Considering the Principles and Elements of design create trifold Brochure for F.I.R.S.T Institute’s Graphic Design and Web Development Program using InDesign.
Before you begin:
Handcraft a Mockup Brochure by hand using paper. Fold one sheet of paper onto itself twice, and label your sides to visualize your format!
Getting Started:
Document Settings
Requirements:
See provided assets below:
Applications used:
Adobe InDesign
Adobe Photoshop
Adobe Illustrator
Applications used:
Adobe InDesign
Adobe Photography
Adobe Illustrator
Applications used:
Adobe InDesign
Adobe Photography
Adobe Illustrator
Applications used:
Adobe InDesign
Adobe Photoshop
Adobe Illustrator
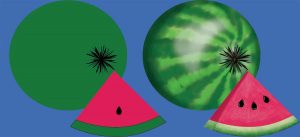
Make your own stylized Illustration on Photoshop from Graphics made in Illustrator using the pen tool.
Style the illustration in Photoshop to give it depth and texture
1) Create Illustration, place the main shapes into individual layers (Release to Sequence)
2) Name your Layers
3) Export as PSD File from Illustrator
5) Open on Photoshop
4) Use the Photoshop Tools, to add value and texture
Stylized illustrations I did for fun after the project:


Applications used:
Adobe Illustrator
Adobe Photoshop
Equipment:
Wacom drawing tablet
Using your latest knowledge of typography and design principles, create 1-2 at 11 x 17″ Movie Posters at 300 ppi. The purpose of this exercise is to sharpen your understanding of the balance between graphics and titles in a composition.
For this exercise, you’ll be using Adobe Photoshop (optional: Adobe Illustrator and InDesign for other elements) Set up your document in Photoshop. Utilize layers and your art boards to create 2 different versions of the same poster. This difference can be typographic, image difference in color and color modes, blend modes or others. The key is to experiment and create two strong options for a potential client.
Incorporate your knowledge of:
Remember the basics:
Dimensions: 11 x 17″ at 300 ppi
Applications used:
Adobe Photoshop